Editing:Atlas Editing: Difference between revisions
7automaton (talk | contribs) (Added Atlas Editing page) |
(Reorganized article a bit) Tag: 2017 source edit |
||
| (14 intermediate revisions by one other user not shown) | |||
| Line 1: | Line 1: | ||
This page describes the creation and editing workflow for Atlas descriptions and bounding boxes on the r/place 2022 Atlas. | This page describes the creation and editing workflow for Atlas descriptions and bounding boxes on the r/place 2022 Atlas. | ||
''(For information on creating or editing Wiki pages, see [[ | ''(For information on creating or editing Wiki pages, see [[Help:Creating_Pages]].)'' | ||
'''This information is only relevant to official community managers. Please do not create or submit edits if you are not an official community leader behind your community's artwork.''' The best way to encourage adding recent and relevant information is to request an update to whoever is managing your community's art. | |||
==Creating a new entry== | |||
To create a new entry, you'll need to be an official community leader that has unoccupied space on the Atlas to fill.<br /> | |||
''If you'd like to update an entry that already exists, or manage and remove duplicate entries, see [[#Editing existing entries|Editing existing entries]].'' | |||
You'll also need to find an unoccupied area. '''Do not add duplicate entries to an existing area - they will be reported and removed.''' | |||
====Drawing your bounding area ==== | |||
Once you find an unoccupied area, click "Show List" on the top left hand corner, then click Draw. You will now be in the Draw mode, which lets you create a new bounding area around your art. Be precise; do not cover art that is not in your claimed area. Do not create intersecting lines within your drawing - do not make self-intersecting polygons. | |||
You can Undo or Redo placed points by clicking the buttons on the sidebar, or by using {{#tag:Code|Ctrl+Z}} and {{#tag:Code|Ctrl+Y}}. | |||
If another bounding area is partially obscuring the area you are attempting to add an entry for, please try your best to cover the entirety of your area despite this. (This means you should cut into a dark area on the Atlas if you really need to, in order to fully enclose your community's artwork.) | |||
When you're finished drawing your area, click "Finish (Enter)" on the sidebar, or press {{#tag:Code|Enter}} to confirm your area. | |||
====Filling in the description==== | |||
After finding an area, a few text boxes will appear in the side panel for adding the name of your area, its description, and links to a website and subreddit. Please fill in all relevant information; if you are not associated with a Discord server or subreddit, for instance, you may leave these fields blank. | |||
Once you're done adding information into these text fields, click {{#tag:Code|OK}}. | |||
====Submitting to Reddit==== | |||
Once you've generated the data for your new area, head over to [https://www.reddit.com/r/placeAtlas2/ r/placeAtlas2]. Create a new post there with nothing in it at all besides the text that was generated. Other desired notes may be added in the comments section. | |||
'''Don't forget to flare your post with "New Entry"''' - that way, it's not missed by moderators looking to review your submission. | |||
Once your post is reviewed and accepted by a moderator of the sub, then they will push it to the Atlas for you! | |||
==Editing existing entries== | |||
There are three ways you can get your submissions edited. Every way to submit is moderated by the r/placeAtlas2 Archival Team. | |||
The recommended option involves the use of GitHub to push your edit through the code on your own.<br /> | |||
You can do this by forking the [https://github.com/placeAtlas/atlas r/place 2022 Atlas GitHub repository], and following the guide below. If you don't feel comfortable doing this, then we highly recommend you find a representative from your community that knows GitHub who can help you submit your change. | |||
The other two ways let you request assistance from other developers to get your submission edited through GitHub. These are the slower, but less technical approaches to submitting a change. You can do this in two ways: | |||
*Leaving information generated from a new Atlas entry in the [https://www.reddit.com/r/placeAtlas2/ r/placeAtlas2 subreddit] and flairing it with Edit Entry... | |||
*...Or by describing your issue in the [https://discord.gg/WfGAy6PKm9 r/placeAtlas2 Discord server] in #atlas-edits. | |||
If you're planning to submit a Reddit/Discord request, please see [[#requesting support|Requesting support]] for a full breakdown: | |||
===Using GitHub to submit a change=== | |||
====What is GitHub?==== | |||
GitHub is a platform used for storing code for apps. Code is stored in different projects called ''repositories''. | |||
Within these repositories, there are separate ''branches'' that are used to separate different versions of the code, which can be ''merged'' or combined into each other. You can also duplicate repositories onto your own GitHub account by ''forking'' an existing repository. | |||
If you're new to this, then don't worry: this guide will walk you through making a change step-by-step. | |||
====Required tools==== | |||
To follow this walkthrough, you will need: | |||
*A [https://github.com/signup GitHub account] | |||
*[https://code.visualstudio.com/ Visual Studio Code] (or any other code editor which you are comfortable with) | |||
====Copying the repository==== | |||
First, you'll want to log into GitHub. If you've never used GitHub before, then [https://github.com/signup create a GitHub account] if you haven't already. | |||
Navigate to the [https://github.com/placeAtlas/atlas r/place 2022 Atlas GitHub repository]. Then find the fork button at the top right corner of the screen. | |||
[[File:Create-new-fork-sm.png|none|frameless|alt=Create a new fork of the repository.]] | |||
If prompted to fork into an account or organization, fork the repository into your own GitHub account. (Optionally, if you'd like to submit a change on behalf of a GitHub organization which you're an administrator of, then fork it into there instead.) | |||
Forking the repository can take up to 30 seconds. | |||
==== Finding the right file==== | |||
Before we do any file editing, '''make sure you switch to the {{#tag:code|cleanup}} branch''' by clicking this button, located on the top left hand side of the file browser. This will switch you to the code that's used for cleaning and maintaining the Atlas. (Changes made from the {{#tag:code|master}} branch will not be accepted.) | |||
[[File:Switch branch button.png|none|frameless|alt=Press the branch button that says master, and switch to the cleanup branch.|Press this button, then switch to the {{#tag:code|cleanup}} branch.]] | |||
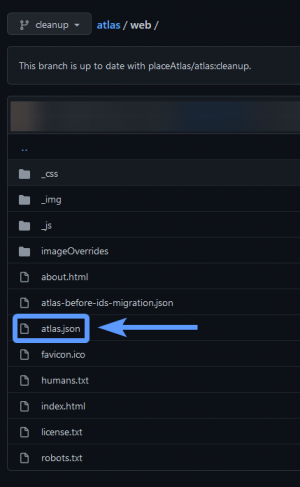
Then, browse into the {{#tag:code|web}} folder, and locate/enter {{#tag:code|atlas.json}}: | |||
[[File:Location of the atlas json in the web folder.png|frameless|none|alt=Locate this specific file, atlas.json, in the web folder.|Locate and click on this specific file, {{#tag:code|atlas.json}}, found in the {{#tag:code|web}} folder.]] | |||
Once you're in the file, the file's size will be too big for you to view and edit within GitHub itself, due to every single person's Atlas submission being in this file. You'll have to save it to your computer to edit it, then upload it back to your repository. | |||
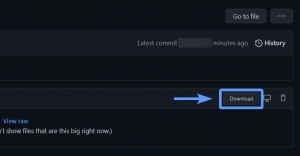
Click on the Download button to the right of the file: | |||
[[File:Download button.png|frameless|none|alt=Click the Download button from within the file itself.]] | |||
Then, right click the page of text that appears and save {{#tag:code|atlas.json}} somewhere that's accessible on your computer, such as your Desktop. Make sure you don't rename it to anything else. | |||
From here on, you'll need a good text editor for code. We will be using [https://code.visualstudio.com/ Visual Studio Code] for reading the {{#tag:code|atlas.json}} file you just downloaded to find and edit your submission. | |||
====Finding entries==== | |||
Open Visual Studio Code and click File > Open, then navigate to {{#tag:code|atlas.json}} to open the file you just downloaded. | |||
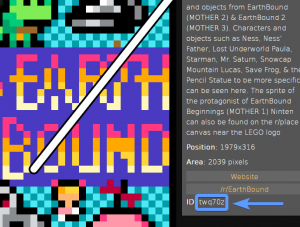
Each entry on the Atlas has an ID which you can search for within this file. It's located below the website/subreddit buttons: | |||
[[File:ID at the bottom of an entry.png|frameless|none|Here's where you can find the ID on any Atlas entry.]] | |||
To search through the entire file for your submission, go to Edit > Find, or press Ctrl + F, to bring up a find menu. Then, type in the name of the entry you'd like to find, or copy its corresponding ID. If there are multiple results, make sure you have the right entry. | |||
====Removing duplicate entries ==== | |||
All it takes to remove a duplicate entry is to delete the corresponding entry's line in {{#tag:code|atlas.json}}. To do this, place your cursor on the line you'd like to remove. Then, to make sure you don't select any other line, you can go to View > Command Palette... (or Ctrl + Shift + P), and search for the command "Delete Line". | |||
Please do this for every duplicate entry that you find for your community's art. Make sure to keep one entry to edit as your Atlas's description. | |||
====Editing entries ==== | |||
Using the Find menu, you can also search for an entry to edit. Once you find the entry you'd like to edit, you can update its name, description, website link, subreddit, and even its drawn path coordinates. | |||
To edit an entry, simply write in new information between the quotation marks. You'll recognize the same content from the Atlas descriptions. '''Remember to replace your username in the {{#tag:code|submitted_by}} field with your Reddit username''' (if applicable). | |||
After editing your community's new information, save the file by going into File > Save, or press Ctrl + S. | |||
====Committing your changes==== | |||
At this point, you've now removed all duplicates and edited your entries and saved your changes into your new and improved {{#tag:code|atlas.json}}. Now you'll need to take your changes and push them to your forked repository, which we'll then push into the main repository you forked from. | |||
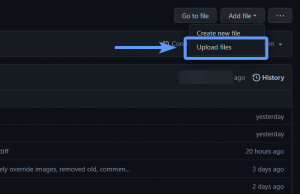
Go back to your repository into the {{#tag:code|web}} folder, where you initially got the {{#tag:code|atlas.json}} file. Click the button that says "Add file", and choose "Upload files": | |||
[[File:Upload files button.png|frameless|none|The button is located on the top right corner of the file browser.]] | |||
From here, you'll see a file upload menu. Choose your newly edited {{#tag:code|atlas.json}} file, or drag it into the area to upload your revision. | |||
Next, we'll be "committing" the file to a tracked list of changes made on your fork. Choose a descriptive commit title, such as "(Community name here) Cleanup". Write whatever you changed in the description of the commit; for instance, if you only edited a section, then only add that to the description: | |||
[[File:Cleanup commit name and description.png|frameless|none|Here's a good example with both an edit and duplicate removals.]] | |||
Once your commit title and descriptions look accurate, click the green "Commit changes" button. | |||
====Pushing your changes==== | |||
Now that you've committed your changes, there's one last step! Click on the "Pull requests" tab at the very top of your fork. Then hit the green "New pull request" button. | |||
At this point, you'll see several different buttons, with an arrow pointing from "head repository" to "base repository". Set the buttons that say "master" on them to "cleanup"; do this for both sides (next to both the base repository and head repository buttons). Once you've switched these, click "Create pull request". | |||
Make sure the title and description are correct, then click "Create pull request" one more time. | |||
Congratulations! You've just pushed a pull request to the cleanup branch of the main repository. A moderator will verify your change and help you merge it into the Atlas! | |||
====Troubleshooting ==== | |||
If you face any of these issues, then please back up your changes, delete your fork and retry this walkthrough: | |||
*You've done your changes on the master branch of your fork instead of the cleanup branch. Your pull request will not be accepted from master to cleanup. | |||
*You see a red "Unable to merge" error towards the end of the process. If you can't fix these merge conflicts, or don't know how, then please restart the walkthrough. | |||
=== Requesting support=== | |||
You may choose to regenerate JSON for your area to add to the Reddit section. | |||
WIP! Check back later. | |||
[[Category:Editing]] | [[Category:Editing]] | ||
Latest revision as of 17:16, 10 April 2022
This page describes the creation and editing workflow for Atlas descriptions and bounding boxes on the r/place 2022 Atlas.
(For information on creating or editing Wiki pages, see Help:Creating_Pages.)
This information is only relevant to official community managers. Please do not create or submit edits if you are not an official community leader behind your community's artwork. The best way to encourage adding recent and relevant information is to request an update to whoever is managing your community's art.
Creating a new entry[edit source]
To create a new entry, you'll need to be an official community leader that has unoccupied space on the Atlas to fill.
If you'd like to update an entry that already exists, or manage and remove duplicate entries, see Editing existing entries.
You'll also need to find an unoccupied area. Do not add duplicate entries to an existing area - they will be reported and removed.
Drawing your bounding area[edit source]
Once you find an unoccupied area, click "Show List" on the top left hand corner, then click Draw. You will now be in the Draw mode, which lets you create a new bounding area around your art. Be precise; do not cover art that is not in your claimed area. Do not create intersecting lines within your drawing - do not make self-intersecting polygons.
You can Undo or Redo placed points by clicking the buttons on the sidebar, or by using Ctrl+Z and Ctrl+Y.
If another bounding area is partially obscuring the area you are attempting to add an entry for, please try your best to cover the entirety of your area despite this. (This means you should cut into a dark area on the Atlas if you really need to, in order to fully enclose your community's artwork.)
When you're finished drawing your area, click "Finish (Enter)" on the sidebar, or press Enter to confirm your area.
Filling in the description[edit source]
After finding an area, a few text boxes will appear in the side panel for adding the name of your area, its description, and links to a website and subreddit. Please fill in all relevant information; if you are not associated with a Discord server or subreddit, for instance, you may leave these fields blank.
Once you're done adding information into these text fields, click OK.
Submitting to Reddit[edit source]
Once you've generated the data for your new area, head over to r/placeAtlas2. Create a new post there with nothing in it at all besides the text that was generated. Other desired notes may be added in the comments section.
Don't forget to flare your post with "New Entry" - that way, it's not missed by moderators looking to review your submission.
Once your post is reviewed and accepted by a moderator of the sub, then they will push it to the Atlas for you!
Editing existing entries[edit source]
There are three ways you can get your submissions edited. Every way to submit is moderated by the r/placeAtlas2 Archival Team.
The recommended option involves the use of GitHub to push your edit through the code on your own.
You can do this by forking the r/place 2022 Atlas GitHub repository, and following the guide below. If you don't feel comfortable doing this, then we highly recommend you find a representative from your community that knows GitHub who can help you submit your change.
The other two ways let you request assistance from other developers to get your submission edited through GitHub. These are the slower, but less technical approaches to submitting a change. You can do this in two ways:
- Leaving information generated from a new Atlas entry in the r/placeAtlas2 subreddit and flairing it with Edit Entry...
- ...Or by describing your issue in the r/placeAtlas2 Discord server in #atlas-edits.
If you're planning to submit a Reddit/Discord request, please see Requesting support for a full breakdown:
Using GitHub to submit a change[edit source]
What is GitHub?[edit source]
GitHub is a platform used for storing code for apps. Code is stored in different projects called repositories.
Within these repositories, there are separate branches that are used to separate different versions of the code, which can be merged or combined into each other. You can also duplicate repositories onto your own GitHub account by forking an existing repository.
If you're new to this, then don't worry: this guide will walk you through making a change step-by-step.
Required tools[edit source]
To follow this walkthrough, you will need:
- A GitHub account
- Visual Studio Code (or any other code editor which you are comfortable with)
Copying the repository[edit source]
First, you'll want to log into GitHub. If you've never used GitHub before, then create a GitHub account if you haven't already.
Navigate to the r/place 2022 Atlas GitHub repository. Then find the fork button at the top right corner of the screen.
If prompted to fork into an account or organization, fork the repository into your own GitHub account. (Optionally, if you'd like to submit a change on behalf of a GitHub organization which you're an administrator of, then fork it into there instead.)
Forking the repository can take up to 30 seconds.
Finding the right file[edit source]
Before we do any file editing, make sure you switch to the cleanup branch by clicking this button, located on the top left hand side of the file browser. This will switch you to the code that's used for cleaning and maintaining the Atlas. (Changes made from the master branch will not be accepted.)
Then, browse into the web folder, and locate/enter atlas.json:
Once you're in the file, the file's size will be too big for you to view and edit within GitHub itself, due to every single person's Atlas submission being in this file. You'll have to save it to your computer to edit it, then upload it back to your repository.
Click on the Download button to the right of the file:
Then, right click the page of text that appears and save atlas.json somewhere that's accessible on your computer, such as your Desktop. Make sure you don't rename it to anything else.
From here on, you'll need a good text editor for code. We will be using Visual Studio Code for reading the atlas.json file you just downloaded to find and edit your submission.
Finding entries[edit source]
Open Visual Studio Code and click File > Open, then navigate to atlas.json to open the file you just downloaded.
Each entry on the Atlas has an ID which you can search for within this file. It's located below the website/subreddit buttons:
To search through the entire file for your submission, go to Edit > Find, or press Ctrl + F, to bring up a find menu. Then, type in the name of the entry you'd like to find, or copy its corresponding ID. If there are multiple results, make sure you have the right entry.
Removing duplicate entries[edit source]
All it takes to remove a duplicate entry is to delete the corresponding entry's line in atlas.json. To do this, place your cursor on the line you'd like to remove. Then, to make sure you don't select any other line, you can go to View > Command Palette... (or Ctrl + Shift + P), and search for the command "Delete Line".
Please do this for every duplicate entry that you find for your community's art. Make sure to keep one entry to edit as your Atlas's description.
Editing entries[edit source]
Using the Find menu, you can also search for an entry to edit. Once you find the entry you'd like to edit, you can update its name, description, website link, subreddit, and even its drawn path coordinates.
To edit an entry, simply write in new information between the quotation marks. You'll recognize the same content from the Atlas descriptions. Remember to replace your username in the submitted_by field with your Reddit username (if applicable).
After editing your community's new information, save the file by going into File > Save, or press Ctrl + S.
Committing your changes[edit source]
At this point, you've now removed all duplicates and edited your entries and saved your changes into your new and improved atlas.json. Now you'll need to take your changes and push them to your forked repository, which we'll then push into the main repository you forked from.
Go back to your repository into the web folder, where you initially got the atlas.json file. Click the button that says "Add file", and choose "Upload files":
From here, you'll see a file upload menu. Choose your newly edited atlas.json file, or drag it into the area to upload your revision.
Next, we'll be "committing" the file to a tracked list of changes made on your fork. Choose a descriptive commit title, such as "(Community name here) Cleanup". Write whatever you changed in the description of the commit; for instance, if you only edited a section, then only add that to the description:
Once your commit title and descriptions look accurate, click the green "Commit changes" button.
Pushing your changes[edit source]
Now that you've committed your changes, there's one last step! Click on the "Pull requests" tab at the very top of your fork. Then hit the green "New pull request" button.
At this point, you'll see several different buttons, with an arrow pointing from "head repository" to "base repository". Set the buttons that say "master" on them to "cleanup"; do this for both sides (next to both the base repository and head repository buttons). Once you've switched these, click "Create pull request".
Make sure the title and description are correct, then click "Create pull request" one more time.
Congratulations! You've just pushed a pull request to the cleanup branch of the main repository. A moderator will verify your change and help you merge it into the Atlas!
Troubleshooting[edit source]
If you face any of these issues, then please back up your changes, delete your fork and retry this walkthrough:
- You've done your changes on the master branch of your fork instead of the cleanup branch. Your pull request will not be accepted from master to cleanup.
- You see a red "Unable to merge" error towards the end of the process. If you can't fix these merge conflicts, or don't know how, then please restart the walkthrough.
Requesting support[edit source]
You may choose to regenerate JSON for your area to add to the Reddit section.
WIP! Check back later.


